Homemade DIY Fabric Face Mask Tutorial and Patterns – Adult and Children Sizes

2020 Fashion Masks

It’s been a while since my last post and the world has been through some major changes since then! I’ve been meaning to post my mask patterns since last year but haven’t found much time in between working from home, spending extra time with family, and making mask orders.

I left my apartment in NYC for a while early on in the pandemic to head back to Ohio to be with my family during the quarantine. I didn’t have my usual tools, patterns, fabric, and setup to get all of the projects done that I had originally anticipated for the year or even record everything to post like I wanted. But I’m happy to say that I’m starting to get back into my projects which I’m really excited about.

My main project for this past year has been making face masks. I’ve probably made over 350 masks at this point. Now that I have all of my tools available to share tutorials and the world has opened up a lot more (not so much here in NYC yet) and wearing masks has become a part of our everyday lives, I wanted to share my fabric face mask pattern with everybody.

I originally based my patterns on the recommendations from hospital websites but they didn’t work for everyone so after fitting them on myself and family members I came up with a few different sizes that I think work for most people; Regular (closer to the standard mask size), Small (petite), Children’s, and Toddler sizes. I personally wear the small/petite size but I listed the measurements below.

I originally created the pattern thinking I’d have to use bias tape as the ear loops, since elastic wasn’t available ANYWHERE and stores were closed with no other options. I was luckily able to obtain some but that’s partly where the inspiration for the design came from.

All of the research I’ve found shows that a tight knit cotton fabric in the best option for face masks. It’s not going to be as protective as a medical mask but it is the most functional option while still making it easy to breathe. I would’t recommend using any other fabrics/fiber contents. I focused on getting a sleek look and finding the best fit with this fabric to allow the most protection and offering a variety of sizes.

“The preliminary results, available online, show that the most important factor to determining whether a mask will protect a person is not the material used, but how well it fits on the wearer’s face.” I made my pattern into 4 different sizes in order to get the best fit!
https://news.northeastern.edu/2020/04/20/pantyhose-toilet-paper-coffee-filters-which-materials-make-the-best-masks-to-stop-the-coronavirus/

I posted the patterns to purchase below along with the sewing instructions. If you have any questions or need any help please leave a comment below!

Supplies:

  • Cotton Woven Fabric
  • Thread
  • Pins
  • Fabric Shears
  • 1/4″ elastic or bias tape
  • Face mask pattern – see mine on Etsy

Fabric Face Mask Pattern Purchase

Adjust elastic/earloop lengths for better fit

  • Regular sized – closest to the standard medical face mask size (H 6 3/4″ – W 7″ – Earloop: 8″)
  • Small/Petite sized – good for petite adults and juniors (H 6″ – W 6 3/4″ – Earloop: 7″)
  • Children’s* sized – kids 5+ (H 5 3/4″ – W 6 1/4″ – Earloop: 6 1/4″)
  • Toddler* sized – kids 2-4 (H 5″ – W 5 3/4″ – Earloop: 5 1/2″)

*Children’s and toddler masks should be worn under adult supervision

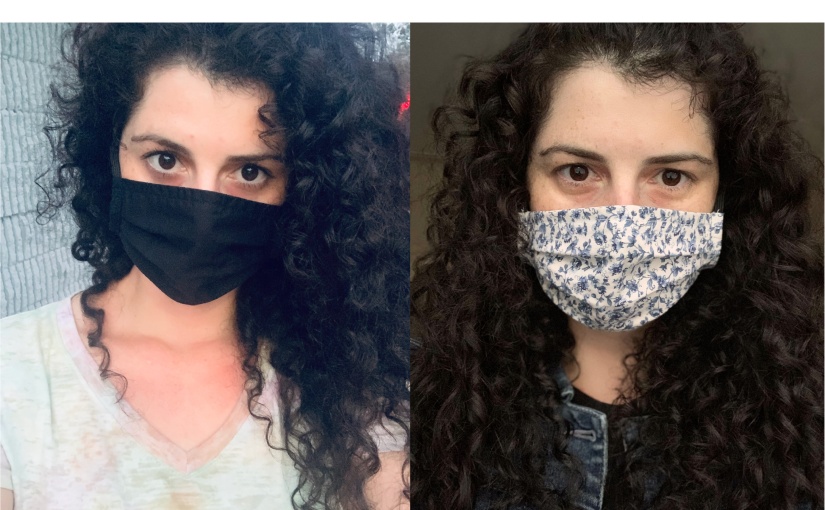
The mask contours at the top and bottom to get a snug fit around your nose and under your chin without adding too much bulk along the sides. The pleats help it open more or less in order to get the best fit on a variety of different face sizes. I finished the side edges with a self binding so that it looks neat and sleek without seeing the bulk of the pleats at the edges. I also like having the elastic coming out of the top and bottom of the mask instead of directly out the sides so that there is less stress and tugging on the ears.

You can purchase a digital download of my patterns on Etsy!

SewSiz Etsy Shop

Sewing Instructions:

Cutting:

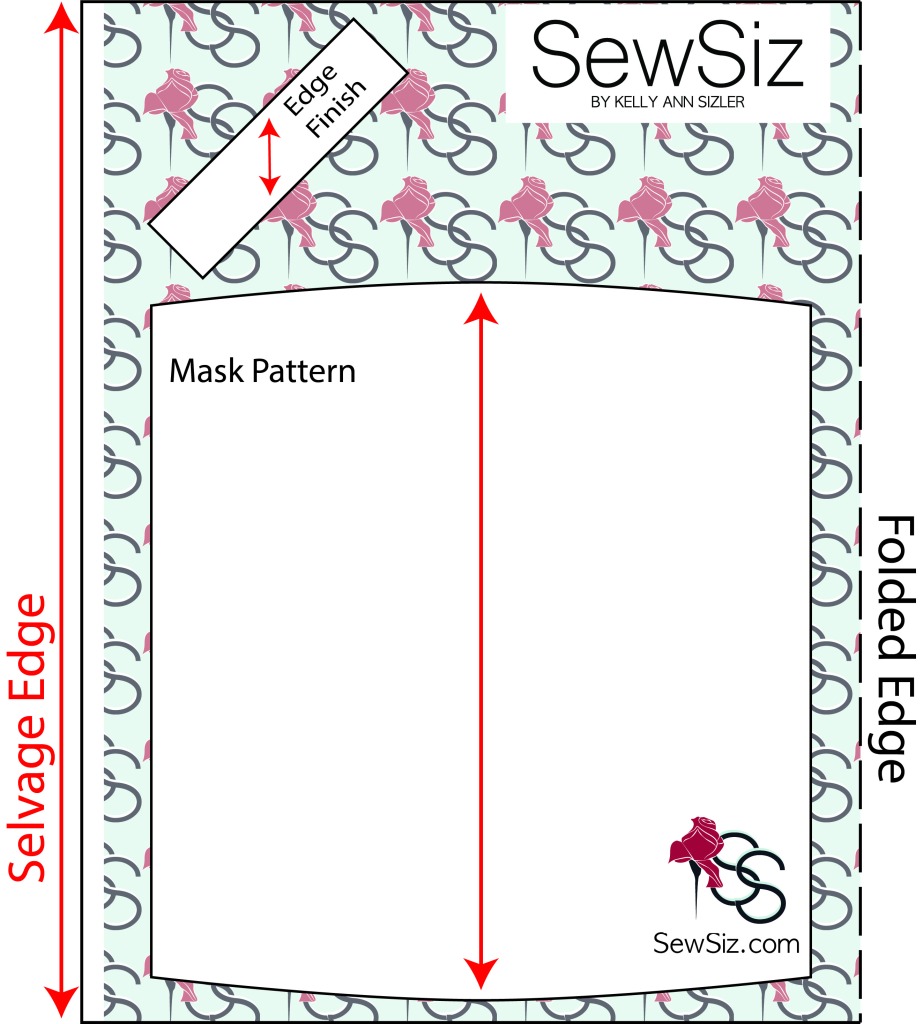
Be sure to cut the mask on the straight grain (cut 2 pieces) with the bias edge trim on the bias (cut 2 pieces). See the below image for insructions.

Cut the elastic to the proper length (see pattern – make adjustments as needed to fit you best)

Fabric Face Mask Cutting Layout Instructions – SewSiz.com by Kelly Ann Sizler

Sewing:

Step 1

With right sides together, sew the pieces together with the 1/2″ seam allowance at the top and the bottom (the part that goes over the nose and under the chin).

Step 2

Flip the mask with right sides out and press these seams open and then flat

Step 3

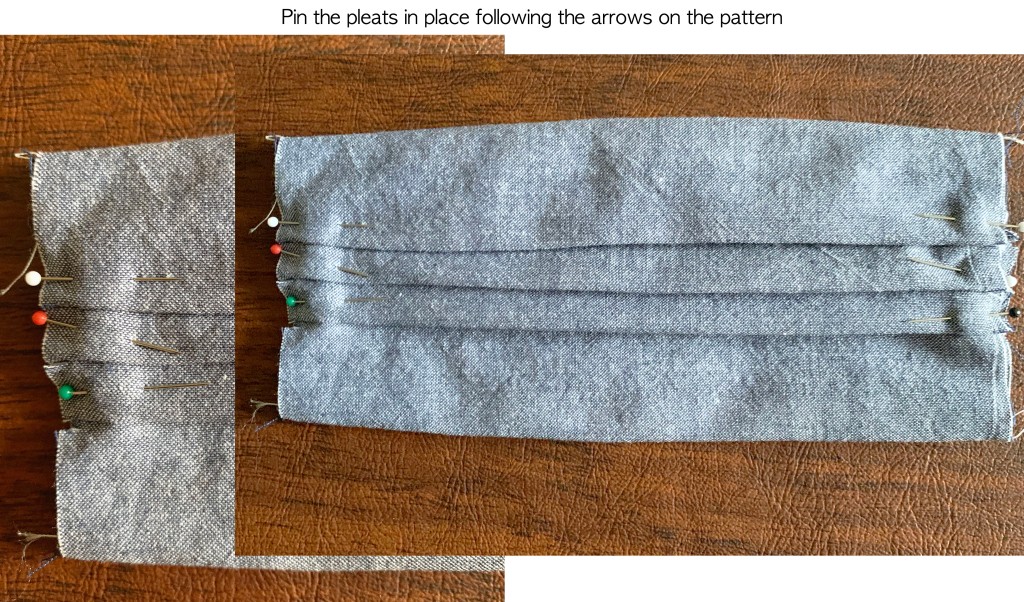
After it’s pressed take the notches and match them up going from top to bottom to get the 3 pleats, pinning them in place as you go. Do this to both sides and iron them flat.

Step 4

Stay stitch the pleats down at 1/4″ in from the edge to secure them before adding the binding edge pieces

Step 5

Pin the bias cut edge finish pieces to the edge with right sides together. Make sure to fold down the 1/2″ seam allowance on the ends (top and bottom) of the bias strip as shown below.

Sew this piece to the mask edge using the 1/4″ seam allowance.

Do this to both sides and then press these seams open

Step 6

Pin the elastic 1/2″ in to the top and bottom of each edge as shown below (make sure the elastic doesn’t twist) and stitch the elastic to the seam allowance to keep it in place.

Step 7

Fold the bias strip over the seam allowance twice so that the raw edgers are enclosed. Pin it down, you can iron it too if that helps you to keep it in place, and stitch it down right next to the seam edge making sure it is all enclosed.

Step 8

Top stitch 1/4″ at the top and bottom part that goes over the nose and under the chin. Make sure you’re starting at the edge and going through the elastic at the sides to reinforce it so that it doesn’t pull out.

That’s the last step, you should now have a fully completed, stylish, sleek contoured face mask!

If you don’t sew but would like to order go to the below page and send me an email!

Made to Order Fabric Masks

Thanks for checking out my post. Please leave any comments and questions below and let me know how this pattern works for you!

I’d love to see your finished products so please tag me in your social media posts! #SewSiz

Stay healthy!!

Kelly Ann Sizler Designs – Tulip Skirt

Tulip Skirt with Contrast Trim

This is the original design that inspired my Tweed Tulip Dress (after I saw the fabric at the FabScrap store in New York City).

I first envisioned this tulip skirt hem detail as a black skirt with white trim around the edge to emphasize the shape of the hem. I think this will be a perfect skirt to wear to office for Spring/Summer!

Since I’ve already done a similar sketch for the dress, I just used that one for the base in order to do a fully rendered sketch (see the full process in my YouTube video embedded in the post below).

SewSiz.com – Kelly Ann Sizler Designs – Tulip Skirt w/ Contrast Trim Final Fashion Sketch

I honestly don’t love how the sketch turned out, it looks a little flat to me and I would prefer to keep going with the marker layering to get more dimension. Here is the original sketch I did when I first thought of the idea of the tulip skirt. I think I did a much better job on this one. Notice how I’ve taken out the waistband in the end, this helps with quick fitting and alteration processes.

SewSiz.com – Kelly Ann Sizler – Tulip Skirt w/ Contrast Trim Original Fashion Sketch

I already had a good start for the pattern for the skirt, because I previously made the dress. So I just altered it so that it was finished off at the top with an attached facing that will be folded over elastic or better stability.

And then, of course, I made a mock up to make sure it looked right. You’d think it should be fine since I’ve already made in in the dress, but the fabric I’m using this time is a bit stiffer so I just want to make sure everything’s perfect with the added facing. After all, I put in all this effort into making something, I want to make sure it actually fits so that I’ll want to wear it 🙂

If items don’t fit right I’ve noticed that I never wear them, and that seems wasteful. See my post on the importance of fit.

SewSiz.com – Kelly Ann Sizler Designs – Tulip Skirt Mock-up

It was pretty much all good! Except it was just a little snug at the hip so I made those alterations to the pattern and got to cutting out the fabric.

I bought some already pre-cut donated black crepe fabric from the FabScrap store in the city (I can’t bring myself to buy new fabric anymore unless absolutely necessary). Current industry practices for the production of textiles and clothing is extremely wasteful and terribly harmful to the environment. I try to do my part by purchasing donated fabric as much as possible and making my own clothing that is easily altered and plan to wear for years to come.

Click the image below for more of my sustainability research.

The Best Sewing Process for Skirts/Bottoms

  • First, as always, finish all of the edges of each piece

Sewing Basics – Seam and Edge Finishes Post

SewSiz.com – Kelly Ann Sizler Designs – Tulip Skirt Sewing Process
  • Next, sew the front body seams
SewSiz.com – Kelly Ann Sizler Designs – Tulip Skirt Sewing Process
  • Then the back body seams
SewSiz.com – Kelly Ann Sizler Designs – Tulip Skirt Sewing Process
  • Next sew the zipper into the left side seam (when it’s flat) and finish the side seam
SewSiz.com – Kelly Ann Sizler Designs – Tulip Skirt Sewing Process
  • Sew the right side seam after the zipper is in the other side
SewSiz.com – Kelly Ann Sizler Designs – Tulip Skirt Sewing Process
  • Finish the top/waistband
SewSiz.com – Kelly Ann Sizler Designs – Tulip Skirt Sewing Process
  • Sew the hem last (and I added the contrast trim)
SewSiz.com – Kelly Ann Sizler Designs – Tulip Skirt w/ Contrast Trim

Below is a time lapse video of my design process from full rendered fashion figure, to pattern making and fittings, and lastly to final garment sewing!

The making of my Tulip Skirt w/ Contrast Trim – Sewsiz.com by Kelly Ann Sizler – YouTube

Fun Fact: The pattern making and sewing portions of this video are increased to speeds up to 50x faster than the original in order to make the video as short as possible.

All ready for Spring at the office!

Please leave any questions or comments below!

Sewing Basics – Fixing Seams and Sewing Buttons

So, I have a new design project coming soon! It seems to be taking me forever to get this second one out while keeping things up to date here. But in the meantime I wanted to post this little basic sewing lesson

Whenever I have a conversation with somebody about sewing and I tell them that I know how to make my own clothes, I’ve noticed that the first thing almost everyone says to me is that “I don’t even know how to sew a button.”

But it’s actually pretty easy! And sewing and fixing up your own clothing is a great way to keep them out of landfills, considering we throw out a significant amount already.

In 2017 8% of all municipal solid waste landfilled in the U.S. was textiles, or 11.2 million tons.

So in this post I want to show you 2 main hand sewing techniques you can use at home to fix up your own clothing, one of which is how to sew buttons!

Let’s get to work 🙂

Watch the full YouTube video below for the full tutorial:

Slip Stitch

This stitch can be used to sew up ripped seams.

Ripped seam

Just start out with a needle and thread and knot one end of the thread.

See the full video for a good trick on how to easily knot the thread end before sewing

Next put the needle in the crease of the seam at the back where the rip starts through to the front and pull the thread through.

Now take the needle and put it in the other side of the seam, in the creased edge directly across from where the thread came out on the other side. And slip the needle behind the crease of the seam for about 1/16″-1/8″ then push it outside again and pull the thread through.

Put the needle in the other side again directly across from where the thread came out and continue this process until you’ve made your way through the entire ripped portion of the seam.

Once you get to the end of the rip go back down the other way towards where you started, continuing the same slip stitch process, to reinforce the seam and get any spots you might have missed.

When you get back to your start position, put the needle and thread through the back and knot it off to finish the stitch.

Final hand sewn slip stitch
Actual ripped seam example on the back side of a pencil skirt above the slit (kick pleat)
Actual slip stitch example sewn on the back side of a pencil skirt above the slit (kick pleat) I did for a client
Actual slip stitch example on the back side of a pencil skirt above the slit (kick pleat) I did for a client – final result

Buttons

2-Hole Button

Start out with a needle and thread and both ends of the thread knotted together.

Put the needle through the back of the fabric where the button used to be and then through one of the holes in the button and pull through from back to front. Then put the thread through the front of the other hole and pull through from front to back.

Repeat this process a few times until the button is sturdy and reinforced through the fabric.

Lastly just make sure you end with the bottom at the back of the fabric and knot off the thread to finish it off.

2-hole button sewing

4-Hole Button – option 1 – parallel stitch lines

Start out with a needle and thread and both ends of the thread knotted together.

Put the needle through the back of the fabric where the button used to be and then through one of the holes in the button and pull through from back to front. Then put the thread through the front of the adjacent hole and pull through from front to back.

Repeat this process a few times. Then from the back go over to one of the other buttons and restart the process with the other 2 holes until the button is sturdy and reinforced through the fabric.

Lastly just make sure you end with the bottom at the back of the fabric and knot off the thread to finish it off.

4-hole button option 1 – parallel stitch lines

4-Hole Button – option 2 crossed stitch lines

Start out with a needle and thread and both ends of the thread knotted together.

Put the needle through the back of the fabric where the button used to be and then through one of the holes in the button and pull through from back to front. Then put the thread through the front of the diagonal hole and pull through from front to back.

Repeat this process a few times. Then from the back go over to one of the other set of buttons and restart the process with the other 2 holes until the button is sturdy and reinforced through the fabric.

Lastly just make sure you end with the bottom at the back of the fabric and knot off the thread to finish it off.

4-hole button option 2 – crossed stitch lines

Jacket Button

Start out with a needle and thread and both ends of the thread knotted together.

Put the needle through the back of the fabric where the button used to be and then through one of the holes in the button and pull through from back to front. Place another needle or pin flat over the button and sew the button on with the pin/needle resting on top of the button and under the thread.

This will allow for added ease behind the button for the thicker jacket/coat fabric.

Continue sewing as you would a regular button and then just slip the needle/thread out when finished

Sewing jacket buttons – use pin for added ease

Shank Button

Now a shank button doesn’t have holes because it has a loop (shank) at the back. They tend to be half dome shaped.

This button is typically used for jackets and coats but you don’t need to sew with the added ease because the shank at the back does that itself.

Start out with a needle and thread and both ends of the thread knotted together.

Put the needle through the back of the fabric where the button used to be and then through the shank hole and pull the button to the fabric. Put the needle back through the fabric from front to back again to attach the button and continue this process until the button is secure.

Shank button

I hope this helps you fix up your own clothing at home. Let me know if you have any questions or need any help in the comments!

DIY Alterations – Making a Dress Sleeveless

Removing the Sleeves

Did you ever buy a dress or a top where the sleeves are slightly too tight and just don’t fit right, but the rest of the fit is okay so you try to make it work anyway?

Sometimes the industry doesn’t take the proper time to get a really good fit in the armhole, or the factory makes mistakes in production, so this can happen. In fast fashion things are done fast, but not necessarily well, for a lot of different reasons.

This is another client project because these dresses were bought despite the fact that the sleeves were too tight, so she just wanted the sleeves to be removed so they could be wearable as sleeveless dresses.

Just keep in mind that you have to be careful with this type of project. If the armhole is too big then it won’t look right as a sleeveless option because the armhole will be loose and have gaps.

So let’s get started! The step by step process is below.

SewSiz by Kelly Ann Sizler – Let’s get started!

And see the full DIY video on my YouTube channel (link below).

Supplies:

Top/shirt/Dress to alter

Fabric shears

Paper for pattern

Paper scissors

Seam Ripper

Clear plastic ruler

Curved Ruler – Option 1

Curved Ruler – Option 2 (I prefer this one for armholes)

Step One: Seam Rip the Sleeves

Use a seam ripper to completely remove the sleeves from the garment

DIY Alterations – Sleeveless Dress – Seam rip the sleeve from the armhole

Step Two: Fit the Armhole

Try on the garment with the sleeves detached to see how the armhole fits.

If it’s too tight like the one I was working on mark where it should be lowered or where the fabric needs to be removed in order to make the armhole more comfortable. I like to use safety pins for this.

*You can’t add fabric to make the armhole fit tighter, so if this is a big garment and the armhole is loose this project won’t work out, as stated above.

Step Three: Make the New Armhole Pattern

If you don’t need to fit the armhole move on to Step Five.

If you need to alter the armhole you need to make a pattern to get the right shape.

First iron/press the armhole to get it to be flat

Next trace the armhole front ad back to get the original shape.

DIY Alterations – Sleeveless Dress – Trace the front and back armhole

After that just draw in the 1/2″ seam allowance to have that in mind (measure your garment to make sure it’s 1/2″ it might be less, if it is draw that measurement).

Measure and mark the positions you pinned to take in on the garment and mark those positions on the traced armhole. Make sure you’re factoring in the seam allowance (or hem) with this measurement since the positions you marked are where you want the finished edge to be, but there will be a hem added on to those measurements.

After those are marked, use your curved ruler to make a new armhole shape. It shouldn’t be curved in too much, it should be similar to the original curved shape with just a few adjustments.

I’m making the new armhole shape from the hem edge. Keep it consistent, if you’re doing it from the finished edge do it all the way from the shoulder and then add the hem allowance to that.

DIY Alterations – Sleeveless Dress – Trace a new armhole based on alteration marks

*If you’re not used to looking at flat patterns, to make sure you have a good armhole shape when you cut out the pattern hold it up to yourself to check that it’s not a crazy curve and make adjustments as needed.

Step Four: Cut the New Armhole

Pin your new armhole to the garment and cut out the excess fabric. Make sure you’re doing the front and back if needed (if you took it down at the under arm the front and back is necessary).

DIY Alterations – Sleeveless Dress – Pin the new armhole pattern to the garment to cut the new armhole shape

I also had a lining in the dress I was altering so after the outer fabric was cut I pinned the lining flat to the outer fabric and cut along the same armhole shape.

Step Five: Finish the Armhole Edge

If you cut a new armhole then you definitely need to do this step.
If not, your armhole edge may already be finished, if it is move on to the next step.

Pretty much all you have to do is finish the edge of the fabric so it doesn’t fray or roll. I recommend using a serger if you have one or a zig zag stitch on your regular sewing machine.

See my edge finishes post here for more details.

Step Six: Sew the Armhole Edge

Next, after the armhole edge is finished, bend back the edge the same amount as the seam allowance and stitch it down. My seam allowance was 1/2″ so I stitched it at 3/8″ in. If yours is a 3/8″ seam allowance I’d recommend a 1/4″ stitch.

Since I had the lining I just made sure the lining was bent back with the armhole edge so it was hidden in the hem as shown below

Step Seven: Press It and You’re Done!

That’s it! Your sleeved garment is now sleeveless and ready to wear!!

DIY Alterations – Sleeveless Dress – Finished products!

Let me know if you have any questions or need any help in the comments! 🙂

Thank you for checking out my blog! – SewSiz by Kelly Ann Sizler

Sewing Basics – Seam and Edge Finishes

Whenever you’re sewing you usually can’t just leave the cut fabric edges raw, chances are it will fray if it’s a woven or roll if it’s knit (for more on this see my fabric types post here).

So here are some examples of basic edge finishes to help you with your next project!

See the full video below on how to do each of these edge finishes:

Zig Zag Stitch

The zig zag stitch is probably the easiest edge finish to use for at home projects. All home sewing machines have this setting. It’s not ideal for fabric that frays a lot or very slippery fabrics, but it will still get the job done.

Clean Finish

Clean finished edges are also very easy to do with any sewing machine since you just need a straight stitch. You simply just are doing a baby hem on the edges of the fabric so that they don’t fray. If you have a fabric that frays a lot or is slippery and can’t use the zig zag stitch, this will be the next best option.

All you need to do is fold the edfe under about 1/8″ and stitch it down.

Sewing Basics – Seam and Edge Finishes – Zig Zag Stitch and Clean Finish Edge

French Seam

A French seam is for sheer fabrics. These seams are enclosed so it looks nice from the outside. This is a seam that essentially sewn twice so any part that would fray is inside of the enclosed seam allowance.

  • The first step is to sew the seam at 1/4″ (for 1/2″ seam allowances) with wrong sides together (opposite than usual).
  • Next cut the seam allowance in half, close to the seam
  • After that press the seam open and then fold it over so that it is right sides together and the seam allowance you just sewed is between the fabric
  • Press it
  • Then sew this 1/4″ in encloses the seam allowance inside
Sewing Basics – Seam and Edge Finishes – French Seam

Flat Fell Seam

Flat Felled Seams are also enclosed seams but they are flat, and stitched down so you can see the extra row of stitching on the outside. These are the types of seams that are used on denim, take a look at one of your pairs of jeans.

  • First, just like the French seam, sew a seam with wrong sides together (full 1/2″ seam allowance this time)
  • Press it open
  • Next cut on of the sides of the seam allowance in half
  • Now take the longer seam allowance side the you didn’t cut and fold it over the cut, shorter, seam allowance. Press it like this
  • Next flip the seam allowance over so that open portion of the folded over edge is pressed down to the fabric
  • After that stitch down over that edge to attach it to the fabric, this way there are 2 rows of stitching
Sewing Basics – Seam and Edge Finishes – Flat Fell Seam

**The French and Flat Fell Seams are difficult to alter though because of the way the seam allowances are trimmed and then enclosed.

Serger Stitch

This stitch requires a serger machine. This is the type of edge finish that is used most in the industry so you’ll find most of your clothing with this type of finish inside. This stitch is also used to sew seams with stretchy fabric because it doesn’t restrict the fabric from stretching like regular sewing stitches would.

Sewing Basics – Seam and Edge Finishes – Serged Edge

Good luck with your project and let me know if you have any questions or need any help in the comments!

DIY/Fix-up – Upcycled Top

Adding Lace Yoke

A client gave me this top to fix up. She accidentally ironed a hole in it before she was even able to wear it once. It’s made out of a polyester/acrylic blend and you have to iron those fibers on a low heat setting or else the fabric can melt easily.

So, instead of throwing it out she wanted to know if there was something I could do to fix it. Upcycling is a great way to keep clothing out of landfills.

“Instead of throwing it out and replacing with a new one, see if you can fix it first. Learning to sew and how to do your own DIY can be a great money saver in the long run, while lengthening the life of the things you own.” – Glamour Magazine UK

*To learn more about fashion’s effect on the environment see my sustainability page here.

At one of my old design jobs we used to add a lot of lace inserts to garments, so I got the idea to add a lace yoke to the back where the hole was using leftover fabric I already had on hand.

See the full DIY video on my YouTube channel (link below) and all the steps in the rest of this post.

Supplies:

Top/shirt

Fabric for the yoke

3/8″ or 1/2″ Twill tape to match garment – can be found near fabric section in craft stores

Fabric shears

Paper for pattern

Paper scissors

Fabric chalk

1/4″ tape

Clear plastic ruler

Step One: Marking Seam positions

Using a thin tape mark on the garment where you want the yoke seams to be. I’m doing mine with a point at the bottom so it looks more intentional, but yours can be straight if you want.

Keep in mind that you’ll need to add 1/2″ seam allowances inside these lines.

DIY Upcycled Top – Damaged top with tape marking where the seams for the lace insert will be.

Step Two: Making the Pattern

First draw the lines where you’re going to cut. Like I said, you need to add 1/2″ inside so that you have room for the seam allowance.

I used fabric chalk to draw the lines, then I added a line 1/2″ in from the armhole trim because I wanted to leave the fabric around the armhole.

DIY Upcycled Top – draw in 1/2′ seam allowance with the clear plastic ruler and chalk

An easier way to do this would be to just cut the top and bottom yoke seams straight through the armhole and cut out that portion of the armhole. Just make sure to add 1/2″ allowance to the yoke pattern there to finish the edge. I would recommend doing that before you sew the yoke into the garment.

DIY Upcycled Top – Adobe Illustrator flat sketch of 2 options for the lace insert – SewSiz by Kelly Ann Sizler.

After that cut out on the chalk drawn lines and the you’ll use this piece to make the yoke pattern.

Once it’s cut grab some paper and trace around the cut piece. Use a ruler to make sure you’re getting straight lines.

DIY Upcycled Top – cut piece from damaged top to be made into pattern

After it’s traced you need to add back the 1/2″ you cut off for the seam allowance on the shirt, and then you need to add another 1/2″ for the seam allowance on the yoke. So you’re adding 1″ total around the whole pattern. (Keep in mind if you’re taking the easier route, that you need to add only 1/2″ at the armhole edge, but still 1″ at the top and bottom)

DIY Upcycled Top – Finishing up the pattern by adding in seam allowances

Step Three: Cut Out Yoke Fabric

After the pattern is don’t, cut it out and then use it to cut out your yoke fabric.

DIY Upcycled Top – Using the new pattern to cut out the lace/yoke fabric – Forgive my chipped nail polish 😦

Step Four: Sew Bottom Pointed Seam

DIY Upcycled Top – Attaching the yoke to to the top, sew the bottom point seams first

Once you sew one side you need to clip in the center of the point on the original garment’s seam allowance in order to be able to sew the other side. Clip the seam allowance up to 1/8″ away from the seam so that it won’t cut into where you’ll see it on the garment. (shown in below pic)

DIY Upcycled Top – Clip in at the center point to fit the yoke into to fit properly to the seam

Once it’s clipped you can sew the other side.

After it’s sewn, press (iron) the seam with the seam allowance away from the lace.

DIY Upcycled Top – finished bottom point seam

Step Five: Sew Top Seam & Armhole Seams

Next do the same thing for the other seams. If you took the harder route, you’ll still need to clip in the corners similar to how you did at the point in order to get the fabric to fit.

Once those are all sewn, press those seams too and grab your twill tape for the next step.

DIY Upcycled Top – Finished sewing the lace yoke seams

Step Six: Sew Twill Tape to Seam Allowances

Attach the twill tape to the seam allowance that will be showing on the inside of the garment with about 1/2″ extending for each seam.

I would do the top and bottom first. Do the bottom pointed seam as 2 separate pieces with the extensions at the center as shown below. Then do the armhole last, if necessary based on which option you chose.

DIY Upcycled Top – Adding the twill tape to the inside seam allowances.

Once that’s done fold under the excess at the center and tack into place, but don’t attach it to the garment just yet.

Step Seven: Top Stitch Twill Tape to Garment

Fold under the excess twill tape ends at the armhole and pin the twill tape to the garment. Once it’s pinned sew the twill tape to the armhole at about 1/4″ in from the edge.

After that, pin the top and bottom seam allowance to the garment, with the pins showing on the back of the garment. Topstitch the twill tape to the garment at 1/4″ above the seam (for the top seam). Do the same with the bottom seam. In order to get a smooth pointed seam, start at one armhole edge and work your way to the point. Stop at the point, put the needle stopped in the fabric, pick up the presser foot, and pivot the fabric to the direction to sew up the other side. Once the fabric is in place, put the presser foot back down and continue sewing to the other edge.

After this step, just clip all the excess threads and you’re done!

DIY Upcycled Top – Finished inside view of the lace insert with the twill tape edge finishes.

I actually wound up adding another row of topstitching 1/8″ away from the first row since the twill tape was wide enough for it. But if you used 3/8″ taping I would just stick with the one row of stitching.

DIY Upcycled Top – Finished product outside view

Finished Product!

DIY Upcycled Top – Kelly Ann Sizler with the finished product on the form – SewSiz by Kelly Ann Sizler

DIY Upcycled Top – Finished product with the lace yoke insert

Leave a comment if you have any questions!

Sewing Basics – Fabric Construction Types

Wovens Vs. Knits

If you’ve never worked with clothing closely this information is probably new to you but I find myself explaining these 3 basic fabrics types to people when discussing, clothing, fit, and commissioned projects so they can get a better understanding of why certain things can’t happen in the fabric, fit, and design world. So I just thought this little piece would come in handy, whether you’re planning on working on any sewing projects or not.

Wovens:

To start off a woven fabric is woven, as in a weave….Duh.

Remember doing those paper weaves to make placemats or something in 1st grade?

It’s that same concept but on a super small scale. Instead of paper individual strands of thread are woven together to create the fabric. The tighter the weave, the thicker and more dense the fabric. Sheer fabric has a very loose weave. And, of course, the thickness of the thread will affect the fabric weight too.

Now there are also different kinds of weaves to create different looks or different types of woven fabric, but let’s just keep it simple for now.

Woven fabrics don’t have stretch so they cannot be used for garments that are meant to be very fitted. They will always require some sort of closure to get on and off, like zippers or buttons, due to the lack of stretch.

They also will fray once cut so the edges always need to be finished. There are many ways to do this but using a a serger, zip zag stitch, or French seams for sheer fabrics are some popular edge finishes.

Woven fabric attributes:

  • No stretch (although sometimes they can have elastic fibers in them and contain a little stretch)
  • Frays when cut
  • Most common uses: Button-up collared shirts, dress clothing, upholstery fabric, outerwear
  • Examples: shirting, twill, chiffon, satin, poplin, taffeta, velvet

Knits (cut & sew):

And at this end, knit fabrics are knitted…another duh

The knitting is in a similar way that a sweater is knit, but the fabrics you buy to make cut & sew knits contain finer yarns and so they are knitted tighter than a sweater.

‘Cut & sew knit’ essentially means clothing that is made from knit fabric that you cut out the pattern pieces with and then sew, as opposed to the way sweaters are knit (see below). If you haven’t noticed this stuff is pretty self explanatory, you just may not have heard these terms before.

A popular type of knit fabric you’re probably already familiar with is jersey, which is what tee shirts and most of your knit clothing is made with. Jersey is the stitch. Just as woven fabrics have different weaves, there are also different stitches knit fabric can come in, however jersey is the most popular.

This fabric has stretch. Depending on whether it contains elastic fibers like spandex, it can have a lot of stretch too. So these fabrics are used for fitted clothing (though elastic fibers are non-recyclable so they’re not that great, environmentally speaking). Clothing made with knit fabrics usually don’t need fasteners, unless they’re complicated styles, because the stretch allows them to slip on and off easily.

Knit fabric doesn’t fray but needs to be sewn with a stretch stitch in order to maintain the stretch in the seams after it’s sewn. Generally the industry uses a serger to sew these fabrics, but most home machines have stretch stitches on them too.

Since it doesn’t fray you can cut it without finishing or hemming the edges, but keep in mind the fabric may roll at the edges.

Knit fabric attributes:

  • Stretches
  • No fraying
  • Needs to be sewn with special stitch for stretch
  • Most common uses: tee shirts, activewear, casual wear, fitted clothing, swimwear
  • Examples: jersey, fleece (sweatshirts), french terry (sweatshirts), scuba

Knits (sweaters):

Sweaters are of course knit, but on a different machine than the knit fabric.

Sweaters have their own type of machine and use thicker yarns. The thicker the yarn, the looser the knit and the chunkier the sweater. The thinner yarns create lighter (fine gauge) sweaters that sometimes have the same appearance as cut & sew knits (gauges are another discussion since sweaters can be very complex, but essentially the lower the gauge the chunkier the sweater).

Sweaters also have different stitches like the fabric. But they also can contain multiple stitches in one piece by transferring stitches without having to cut and piece them together. Or seamlessly as you might say. 🙂

Sweaters are knit in the shape of the garment’s pattern pieces and then any seams are linked together with yarn. Therefore they are not cut & sew because there is no cutting or sewing machine involved.

Sweater attributes:

  • No sewing
  • Knitted garment patterns all in one piece including all finishings
  • Most common uses: sweaters, socks/hosiery, winter scarves, gloves, hats
  • No examples because a sweater can contain many stitches in one garment, even the edge finishes are different stitches in themselves

I could definitely go into greater detail on each fabric construction, but hopefully this just gives you the basic knowledge you need to help you pick out the correct fabric type for your next project or to understand what your clothing is made of a little better.

If you have any questions please comment below!

Shopping Issues – The Importance of Fit

This is one of the biggest reasons why I decided to start making my own clothing and start this site. I’ve gotten pretty tired of not being able to find clothes that fit anywhere, even just a little bit. And I’m sure most people can agree.

The main problem is that clothing is made using the same standardized proportions across all sizes, but people are made of all different proportions.

I, for example, have a waist measurement that goes between a size 4-6, but my hips measure closer to a size 10. This makes it nearly impossible to find clothes that actually fit.

I generally pick somewhere in the middle as long as the garment has stretch, choosing sizes 6 or 8. But then I wind up having sagging waistbands and pulling my pants up all day long or fidgeting with my skirts trying to keep them from riding up. Also, I’m sick of wearing only stretchy clothing. The quality is generally poor and it usually just means that everything is made to be super tight, which doesn’t seem appropriate for all occasions. Not to mention, there’s all kinds of cute woven styles that are trending now that I feel like I’m missing out on due to my curvier shape (if you’re not sure what a woven is see my basic fabrics post coming soon!).

Curly-locks and the Three Skirts – Part 1

Just a little small at the hip, but too big at the waist

Here is an example from when I was trying to buy a skirt for work at Express last year. The first set of pictures is a size 8, so that it would fit my hips okay. I could tell by the fit that I couldn’t really go any smaller, the 8 was already a little snug feeling around the hips and not very comfortable. But look at the size of the gaps around the waist. If I wore this skirt it would be riding up all day. The hip portions would be moving up trying to work it’s way to were it fits best and the waist is not fitted enough to keep it in place.

Shopping issues Front View – Skirt fits at the hip but is to big at the waist
Shopping issues Side view – Skirt fits at the hip but is to big at the waist

In order to be able to wear this comfortably I would need to let the hips out a bit and then take it in at the waist. However industry standard seam allowances don’t allow for enough room to let anything out. I could go for the size 10 but then I’d need to take it in even more at the waist and the contouring would be off. The fabric would bunch around the belly in the middle because it’s actually the shape of the pattern that needs to be adjusted. So in the end it will still be uncomfortable and not worth all the work.

Curly-locks and the Three Skirts – Part 2

Okay at the waist, but way too tight at the hip

Here’s an example of a smaller skirt, I think a size 6, which is okay in the waist if I pull it down a little lower than my natural waist position. But I guarantee that if I sat down in this skirt the seams would bust open. It’s extremely uncomfortable and not very flattering.

Shopping issues Front View – Skirt is too tight at the hip but fits at the waist – See fabric stress marks

You can tell by the creases in the front that the fabric is stretched too tight around my hips.

Shopping issues Side View – Skirt is too tight at the hip but fits at the waist

Curly-locks and the Three Skirts – Part 3

Just Right! 🙂

In contrast, this is a skirt I made for myself to fit my measurements (it’s actually a first mock up of a skirt I’m working on and the gathers at the front are intentional).

Front view – Custom made skirt, by Kelly Ann Sizler, with the perfect fit!

I don’t have to fidget or adjust this skirt once throughout the day! Because it was made to fit my shape not the standard proportions.

Side view – Custom made skirt, by Kelly Ann Sizler, with the perfect fit!

For professional attire I advise on investing in some custom made/custom fitted clothing. Maybe start by taking some of the items you already own and like to a tailor to see if you can get alterations, and a better idea of how to shop to get a better fit. Just a few staple investment pieces that fit well will make timeless additions to your wardrobe and overall give you a more professional look.

Buy less and invest in items that fit. – SewSiz by Kelly Ann Sizler

At the end of the day, you could be wearing basic black pants and white shirt, but if it fits properly you could very well come across as the best dressed person in the room.

The fit is the most important part.

I’d love to hear more about other fit issues anyone else has when shopping. Please leave a comment!

Kelly Ann Sizler Designs – Tweed Tulip Dress

Princess Seam Sweetheart Neck Tulip Hem Dress

This tulip hem design idea originally came to me in skirt form. But then I found this black, cream, and pink tweed fabric at the FabScrap store and I couldn’t resist making it into a dress version perfect for the office!

Tweed fabric for my Tulip Dress project with cream, pink, and black threads from the FabScrap store.

First I needed to get the initial idea out with a rough hand sketch.

Hand drawn fashion figure sketch of my Tweed Tulip dress design, by Kelly Ann Sizler

I’m not going to lie, I usually do this a bunch of times after the initial idea pops into my head. I’ll draw doodles and rough sketches while I’m on hold on the phone at work or just watching TV at home. It’s kind of like an itch you can’t scratch and I just need to get it figured out over and over until I know exactly what I want and how I’m going to make it. I like to walk around with small little sketch books fo this reason.

One of my many fashion sketches of my Tulip dress, I used this one as a bookmark for a while, by Kelly Ann Sizler

After the initial sketch, I drew a flat sketch in Adobe Illustrator. This is the type of sketch that I would do at my jobs in the industry to show buyers and send to factories overseas.

Once the idea and plan were finalized it was time to start working on the pattern. Making a new garment requires multiple sessions of pattern making and fittings. I already had a similar skirt pattern so I first got to work on making a basic bodice to go with the skirt.

After fitting the bodice I made some adjustments to the pattern and then made a new mock up of the full dress with the skirt. It wasn’t too bad but there were definitely still some fit adjustments to be made. It’s always fun to see the garment start coming together though! I also still needed to add the design details to the top, like the sweetheart neckline and to draft a sleeve pattern. I like to do this part after the bodice and armhole are fitted properly, since I didn’t have a sleeve pattern already made to fit myself.

After finishing this round of pattern adjustments I made up another full mock up to see how it looked and fit, so this is now mock up #3. Even yet, there were still a few more fit adjustments to the armhole, sleeve, and at the bottom of the back skirt. I was getting a little anxious to get to the final garment so I just made a half bodice mock up to make sure these alterations weren’t crazy looking on the top. I was pretty confident that the skirt adjustments would work out fine. I probably could’ve done more fittings but at a certain point you have to draw the line somewhere. Although, in reality, I wish I would’ve just done one more full mock up because I had to do a couple of fittings and adjustments on the final garment. Just something to keep in mind for the next project!

Below is a time lapse video of my design process from initial sketch, to flat sketch, to pattern making and fittings, to final garment sewing!

Fun Fact: The pattern making and sewing portions of this video are increased to speeds 100x faster than the original in order to make the video as short as possible. I didn’t even get all the sewing in because my phone stopped recording.

It’s definitely a process but at the end of the day (or weeks of days after work) the final product is worth it!

I wore the dress to work and as I was walking with a coworker at lunch a woman ran up to me exclaiming, “I love your dress!” I knew she wanted to know where to get it, that’s the main reason people compliment each other, but it was so exciting to be able to respond with “thank you, I made it.”

It made my day!

The final result of my Tweed Tulip dress, by Kelly Ann Sizler
Tweed Tulip Dress by Kelly Ann Sizler
Happy with the result! Tweed Tulip Dress by Kelly Ann Sizler

Please leave any questions or comments below!

Fashion Sustainability – What is it and Why is it Important?

WHAT IS SUSTAINABLE FASHION?

“It’s a movement aimed at making the fashion industry more environmentally responsible by changing the way clothes are designed, made, transported, used, and discarded.” (1)

HOW DOES FASHION HARM THE ENVIRONMENT?

Some might say that the Fashion Industry is one of the hardest industries on the environment. Carbon emissions from textile production exceed those of all maritime shipping and international flights combined (1). 

Many synthetic fibers used in clothing today are non-recyclable and even just their production can cause a lot of harm. Stretchy fibers like lurex (Spandex is the brand name most are familiar with) are used in most clothing today because it helps to narrow the breakdown of size runs by allowing the fabric to stretch and fit a wider range of sizes. However this is a non-recyclable material so once the other fibers are mixed with it, there’s no possible way to separate them to breakdown and reuse or recycle them. 

On the other end, natural fibers aren’t any better. In order to cultivate as much as possible and keep the prices low, cotton production uses a lot of harmful pesticides and tremendous amounts of water. So unless the garments are made with organic resources chances are they’re causing a lot of harm to the ecosystem.

The environmental issues aren’t just in the production phase, but since most of our clothing is now bought to be worn only a few times and then thrown out due to fast fashion trends and overall lack of garment quality, a lot of clothing and textile is ending up in landfills. 

“People are buying more clothes and keeping them for shorter periods. The average number of times a garment is worn in Europe before it is retired has dropped by a third in 15 years.” (1)

Lurex and nylon cannot be recycled so unless those items can be repurposed they will inevitably wind up in landfills and can take decades to biodegrade. On top of that, the dye and chemicals from the fabric can leach into the soil and contaminate local water supplies (FabScrap.org).

Examples of biodegradable textiles: cotton linen, wool, bamboo, hemp, silk, rayon (most rayon manufacturing processes in use today are not considered environmentally friendly) (4).

HOW DOES THE FASHION INDUSTRY EFFECT PEOPLE AND CURRENT SOCIAL ISSUES?

Fast fashion and even high end retailers send manufacturing overseas to take advantage of the dramatic cost decreases. They need to utilize these resources to keep up with the consumer demand for paying bottom dollar for most items today.

In 2013 there was a catastrophic building collapse at a sweater factory in Bangladesh after there were some concerns raised about the state of the infrastructure not being able to hold up against the power of the knitting machines. Over a thousand workers died and many more were injured after being pressured into going back to work that day despite the concerns (see sources below for more info).

https://www.hrw.org/news/2018/04/24/remember-rana-plaza#

“Each year, some $30 billion worth of clothing leaves Bangladesh bound for stores like H&M and Zara.” (2)

“between 2011 and 2016 profit margins at supplier factories in Bangladesh fell by around 13 percent, according to a report published by Pennsylvania State University’s Centre for Global Workers’ Rights last year.” (2)

We’re producing so much in these countries but not paying them enough because stores want to be able to give their customers the lowest, most competitive prices while still maintaining a high profit margin. How can we expect the factories to improve pay and working conditions while also refusing to adjust our pricing models? If anything our pricing strategy is getting even worse for the factories and they aren’t getting enough profit to make adequate changes.  It’s crazy to just expect these worker’s conditions and quality of life to improve if we’re not even willing to pay a little more for the items we purchase. Even though you can purchase a top for $10, someone somewhere may be paying a price for that.

HOW CAN WE MAKE A DIFFERENCE?

“In 2017 millennials in the US alone spent about $200 billion and it is estimated that, by the end of 2018, they will have more spending power than any generation.” (3)

Some people may think, how can we make a difference? We have the power to control where we put our money. When we spend it on items that are bad for the environment and to their factory workers we are only enabling the industry to keep using the same practices. But when they see patterns of customers making an effort to purchase items because they come from sustainable resources they will make the change. They will do whatever it takes to get and keep as many customers as possible.

So far H&M and Zara have both made sustainability pledges. “All of the cotton, linen and polyester used by Zara will be organic, sustainable or recycled by 2025” (5) and H&M pledged to transition to 100% sustainable cotton by 2020 and is around 95% there as of this year (6). On top of that H&M is also aiming to use only recycled or sustainable materials by 2030 (6).

Vintage, resale, and clothing rental sites have also become very popular in recent years. These are fantastic ways to get new clothes that you only intend to wear a few times without being wasteful. Even Express is jumping on the bandwagon with their new clothing rental subscription Express Style Trial

Of course we can’t fix the problem over night. People can’t necessarily just stop buying everything, that would be catastrophic to the economy. But if we just make a little more effort to start finding and purchasing items from sustainable places and not buying items to throw away in a week, hopefully we can see some turnaround in years to come. 

By choosing to put our money in the right places we have the power to make a difference. All it takes is a little education and some integrity.

Below are some resources for sustainable shopping and also solutions for repurposing, donating, and recycling old clothing that we don’t want to throw away. 

CLOTHING/ACCESSORIES: 

Express Clothing Rental Subscription: https://www.expstyletrial.com

Reformation: https://www.thereformation.com

Verishop: https://www.verishop.com/collection/responsible-store

Naadam Sweaters: https://naadam.co

FABRIC: 

FabScrap: FabScrap.org

Queen of Raw: https://www.queenofraw.com

BEDDING: 

Buffy Comforters: https://buffy.co

RECYCLING:

Nike Reuse-A-Shoe Program: https://www.nike.com/help/a/recycle-shoes

Adidas Recycle Take Back Program: https://www.adidas-group.com/en/sustainability/products/end-of-life/

Green Tree Recycling: https://www.greentreetextiles.org/donate/

SOURCES

(1) https://www.washingtonpost.com/business/energy/ready-to-wear-and-re-wear–meet-sustainable-fashion/2019/06/28/bd09c660-996a-11e9-9a16-dc551ea5a43b_story.html

(2) https://www.businessoffashion.com/articles/professional/6-years-after-rana-plaza-worker-safety-is-under-threat-in-bangladesh-again

(3) https://www.forbes.com/sites/julesschroeder/2017/10/31/how-to-tap-into-the-millennial-200-billion-buying-power-with-social-media/#4affb99a1161

(4) https://edgexpo.com/2017/09/05/edge-fast-fact-non-biodegradable-clothes-take-20-to-200-years-to-biodegrade/

(5) https://www.cnn.com/business

(6) https://www.refinery29.com/en-us/2019/07/237347/h-m-racist-hoodie-controversy-diversity-problem